Tuesday, November 5, 2013

Earth Works - Eco Friendly Art in the Classroom


Before it gets too cold my Art 1 & Sculpture classes completed a Land Art project.

We first checked out an amazing video by Tony Plant.  This helped the students understand why art is created as well as introducing the idea of it being temporary.  My Art 1 classes worked together as a table to create their pieces whereas the sculpture class worked individually.  It was nice to see how their approaches to the project were so different.

Land Art  Lesson


Thursday, October 17, 2013

Art 1 : Photoshop Head Swap

Obama's face on Bush's body
 Art 1 tried out a fun mini project today in Ms. Sudkamp's class.  Most of these students have never used Photoshop before and are just starting to understand the editing software.  Using this awesome tutorial the students became familiar with layers, cropping, blending, and moving within photoshop.  Hopefully more to come soon!

Hipster Kitty Bear


Tuesday, October 15, 2013

Stenciled Self Portrait

Art 1 classes we have been working on stenciled self portraits.  After painting our background images (based off of non-objections pieces) we edited photos of each students using Pixlr.com.  They changed the contrast and exposure of each image.  In doing so they were able to filter their images to the "art poster" seting. Using the projector we traced the images to create our own stencils. 

 Layering the pieces helped show the positive and negative space.  This project was successful for all ranges of art students. 

Wednesday, September 11, 2013

Forced Perspective Photography

Perspective changes everything.  I thought it might be fun to try something different this week.  The kids have been working on their realism drawings for the past 2 weeks, I thought we'd try something else. Inspired by Ian Sand's post earlier this year we took a shot at forced perspective.  


I introduced forced perspective photography as art that incorporates an opitcle illusion based on perspecitve.  Students even watched a video on how they used this method in Lord of The Rings. If you'd like to see how they were introduced check them out here. 


Monday, September 9, 2013

Pinterest in the Classroom

I (Ms. Sudkamp) have had a Pinterest addiction for quite some time. It is a GREAT resource for inspiration, finding artist, and my favorite: tutorials.  This week the Sculpture/Ceramics class completed their own boards for their next project.  


 Each student had to complete a board on Pinterest based on relief work (their next project).   Each board included inspiration, reference photos, and tutorials. The kids had a blast. Want to see their upcoming project on relief work?  Check it out here! Ha ha, you'll even see my boards for the project.


Thursday, August 15, 2013

I've Moved! High school here I come!

I've moved! Though I loved teaching elementary school I've on my way to the high school level.  Now instead of dealing with kids who might pee their pants I get to deal with angsty hormonal teens. I can't wait. Later this month I will start working at Apex High School with an amazing staff of 3 other art teachers. Apex High School's Art Department even has their own blog.  Check it out!


To all you elementary teachers: don't worry!  I have not abandoned you.  I still have some photos and projects to upload on here.  Though projects for the youngins may not come as often, they will still be there.  My plan is that next summer to host a children's art camp.  There will be more kids art, I promise.

Thank you for your support,
Make Art!

~Kim

Thursday, May 9, 2013

Functional Paper Making: Recycled Art in Elementary

Students creating the base of their bowls (2nd grade)
      For Earth Day I wanted to incorporate recycling within art but honestly... recycled art looks like trash glued on a board 90 % of the time when done by kids. Over the semester I have been collecting every tiny scrap paper I could get my hands on.  The kids and teachers know of my "hungry hungry scrap box" and help me with this process.  After separating the colors out it was time for paper making!  All you have to do is blend paper and water in a blender, strain and slightly squeeze out the water.  You will end up with a mushy pill of pulp.  After a couple times you'll get the hang of how much water to paper (more water is better).
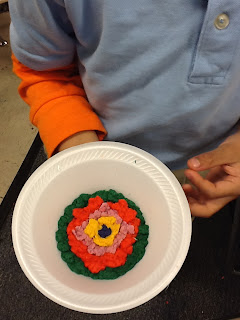
It is important to build the base of the bowl first.  Each color should be applied in a small pinch or ball.  Once the entire bowl has been made with the little balls of paper pulp you can press it, linking the fibers. Once dry you can paint with glue, harden, and pop out.  These bowls will stand on their own! They are even strong enough for a set of keys to be placed inside.

This is a great end of the year project to use up all those scraps or even right round Earth Day, focusing on recycling.  I used an AWESOME video talking about paper.  Where it comes from, how it is made, invented, recycled, and even more!  Check it out HERE.


In progress paper bowl (2nd Grade)
The kids had a blast! They almost can't believe that what they made comes from the materials too many of us toss from day to day.


Important vocabulary:
Paper Pulp
Fibers
Pattern
Texture


****Special Credit to Kim Furstenberg of Ayden Elementary for the wonderful inspiration.  She created paper bowls with holes in the side, making them into tambourines for the music element.